|
Instrument Database:
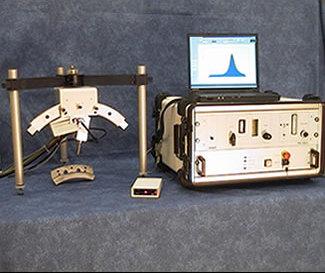
Austin AI, LLC - StressX3000 portable X-ray diffraction system
| |
|

|
| |
|
| |
|
| Year of introduction |
|
| Status |
available |
| Company |
Austin AI, LLC
|
| Categories |
X-ray spectrometer: XRD
|
Main features
- allows to measure residual stress and residual austenite, providing a thorough non-destructive analysis of samples of any dimension, so detection can be made directly
- is fully controlled by software: it includes the goniometer, with interchangeable omega and psi geometries, a linear position sensitive detector, the X-ray generator with X-ray tube and the portable computer
- can drastically improve the quality control of your iron-based products adding speed and precision to your stress analysis, even in the case of big samples
Features
StressX-3000 is the latest portable X-ray diffraction system designed for the analysis of residual stress and the calculation of the percentage of retained austenite
Residual stress is due to thermal treatments, mechanical processes, welding and surface treatments that the pieces undergo during the manufacturing processes. This type of stress permanently influences the piece's resistance, especially under strain, and often it is the cause of breaks that have no metallurgical justification.
The importance of residual stress analysis is growing. Welded structures, gears, shot-or sandblasted parts, thermal and many other treatments can be controlled and monitored with the help of X-Ray diffractometer. Reducing the data collection time is the next step, which this instrument is capable to offer.
Measurements of stresses in metals are made by using the distance between the atoms plans, as a stress gauge. The distance is measured with the help of the diffraction of an X-ray beam on the analysed part.
Even a small percentage of residual austenite (5%) can cause deformations that make the piece unusable. An example can be given with ball bearing tracks and injector pins for diesel motors. Detection of their presence can optimise thermal treatment
Applications
- definition of the quantity of residual austenite on bearings and parts of diesel motor injectors
- detection of residual stress on sprocket wheels
- detection of residual stress on car motor parts (cam axles, connecting rods, engine shafts, equalisers)
- detection of residual stress induced by deep drawing (household appliances, structural parts)
- detection of existing operational stress on gas conducts
- detection of operational stress on large tensioned structures
- measurement of efficiency of shot-peening and rolling of components subjected to stress
- detection of residual stress in castings (cast iron parts of tool machines and aluminium automotive components)
- detection of stress induced by (laser and electron) welding
- search for a correlation between residual stress and stress resistance of aluminium alloy car rims
- optimisation of working parameters for swarf removal to improve the stress resistance of mechanical components
- detection of residual stress on helicoidal and leaf springs
- search for critical zones after applying work loads (arms and aeronautics)
- This compact system includes a central unit, a goniometer and a portable computer
CENTRAL UNIT
High voltage X-ray generator
Controls PSD detector and step-motor
All interlocks required for complete safety
GONIOMETER
Mounted on a tripod (magnetic anchoring as option)
Selection of Y(PSI) or W (OMEGA) geometry, Y (PSI) tilt
Computer controlled step-motors for all movements
Easy sample alignment system
DATA ACQUISITION SOFTWARE
Running under Microsoft Windows 98 Operative System
Complete control of the hardware
Wide selection of measuring points
Displays in real-time the growth of the peaks
Retained Austenite measurement and calculation
ANALYSIS SOFTWARE
Running under any Microsoft Windows Operative System
Peak treatment: LPA correction, background subtraction
Peak analysis: fast methods, Marquardt fit, top 15% parabola fit
Stress analysis: linear and elliptic
Tools: creation of reports, 3D graphs
|
| Specifications |
|
|
X-ray generator
30 kV, 10 mA continuously variable. Compact design
X-ray tube
30 kV, 6.5 mA, Cr anode as standard Cu, Co, Fe, V, Ti and Mn can be supplied as option
Collimator
1, 2, 3 mm diameter as standard. Other sizes available.
Goniometer (mounted on a vertical holder with highly precise regulation of Z position)
Angular range from -45° to +45° y
Diffraction angle and range 156° 2q ± 10°
Oscillation ± 1°, ± 2°, ± 3° y
Detector (It can be turned 90 degrees to enable measurements in either the y (Psi) or w (Omega) orientation)
Position Sensitive Detector: 5 cm window, corresponding to 20 deg; 0.022 deg/channel
Analogic ratemeter
Cooling system (water cooling with heat exchanger for X-ray tube)
Power 250 W
Capacity of tank 5 liters
|
|